Deploy Next.js T3App
Introduction
Deploying a full-stack Next.js web app can seem complex, but with the right tools, it's straightforward. This tutorial will cover the essentials to get your app up and running quickly:
- Initializing Next.js project using CT3A: How to initialize a full-stack, typesafe Next.js app using T3 App scaffolder.
- Deploying Next.js app on AWS Lambda: How to use Stacktape to deploy your web app using a serverless approach.
- Setting up a Postgres database with Prisma ORM: Steps to integrate a robust database system with your app using Prisma ORM
- Implementing Authentication with Cognito: Simplify user authentication by integrating AWS Cognito and NextAuth.js into your app.
This guide is designed to be practical and to the point, ensuring you can deploy your app efficiently with Stacktape.
Prerequisites
To complete this tutorial, you will need:
- NodeJS (18+) installed on your system
- Stacktape account and AWS account connected to your organization
- (OPTIONAL) If you are using VSCode, we recommend using our Stacktape extension for easier writing of Stacktape template.
Initializing App Using CT3A
Initialize your app using T3 App scaffolder.
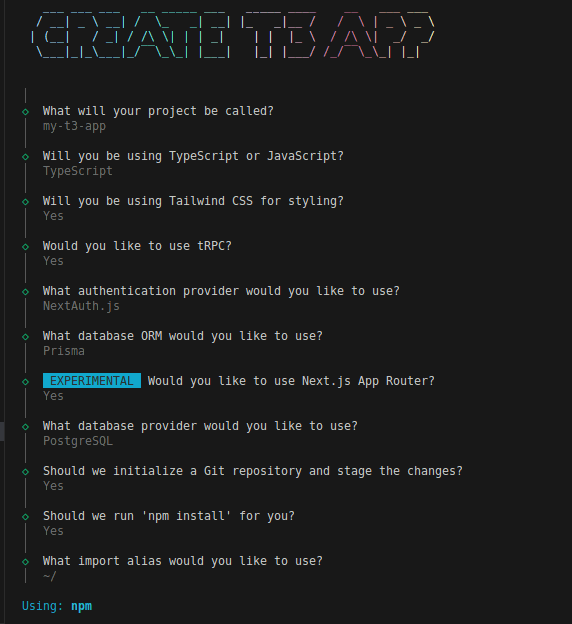
To scaffold an app using create-t3-app, run the following commands and answer the command prompt questions:
Copy
npm create t3-app@latest
Create stacktape.yml
In your project directory root, create stacktape.yml file.
Every Stacktape project starts with a simple template file. This is your app's single source of truth, the blueprint of your app. Unlike other setups where you might juggle multiple template files for different tools, Stacktape brings everything into one place. You can write your template in YAML, TypeScript, or even Python.
In this tutorial, we will be using YAML.
To write the Stacktape template more efficiently, consider using our VSCode extension or the stack composer editor in the console.
Add nextjs-web resource
Add the resources section with nextjs-web resource
called web to your stacktape.yml file.
Copy
resources:web:type: nextjs-webproperties:appDirectory: ./
Contents of stacktape.yml
The nextjs-web resource type is a purpose-built resource for deploying Next.js app using AWS Lambda. In the background, it packages your Next.js app and creates multiple different AWS resources required to run your website as efficiently as possible. To learn more about the resource, refer to our docs.
Add relational-database resource
In this step, we add a relational-database
resource to our template. Since during the CT3A initialization, we have chosen to use PostgreSQL. Therefore, the
database should also use the postgres engine.
Copy
resources:web:type: nextjs-webproperties:appDirectory: ./database:type: relational-databaseproperties:engine:type: postgresproperties:primaryInstance:instanceSize: db.t4g.microcredentials:masterUserPassword: $Secret('t3app-db-password')
Contents of stacktape.yml
You might notice that the password for our database references a secret using a $Secret directive. We will create the secret later in the tutorial.
Add user-auth-pool resource
We use Cognito user-auth-pool to provide an authentication mechanism for our Next.js app. By using this resource, we offload user management and authentication responsibilities from developers to a managed service. Luckily, Cognito user-auth-pool easily integrates with NextAuth.js, which we have chosen as our authentication provider during the CT3A initialization.
Copy
resources:web:type: nextjs-webproperties:appDirectory: ./database:type: relational-databaseproperties:engine:type: postgresproperties:primaryInstance:instanceSize: db.t4g.microcredentials:masterUserPassword: $Secret('t3app-db-password')userPool:type: user-auth-poolproperties:generateClientSecret: truecallbackURLs:- $CfFormat('{}/api/auth/callback/cognito', $ResourceParam('web', 'url'))logoutURLs:- $CfFormat('{}/api/auth/signout', $ResourceParam('web', 'url'))
Contents of stacktape.yml
You might notice that we have set
generateClientSecrettotrue. Client secret is not generated by default but is required when using CognitoProvider with NextAuth.js.We have also set allowed
callbackURLsand allowedlogoutURLs, which need to be configured for sign-in/sign-out to work.Since we do not know what the URL of our Next.js web will be yet (Stacktape will assign URL during deployment):
- we are using $CfFormat directive to "compose" the final URLs during the deployment.
- Inside the $CfFormat directive, we are using
$ResourceParam directive to get
urlparameter of ourwebresource. This directive will also be resolved during the deployment.
Add environment variables
We have added relational-database and user-auth-pool resources, but we still need to pass information about them
into our nextjs-web resource. We will do this by using environment variables.
Copy
resources:web:type: nextjs-webproperties:appDirectory: ./environment:- name: DATABASE_URLvalue: $ResourceParam('database', 'connectionString')- name: NEXTAUTH_SECRETvalue: $Secret('t3app-nextauth-secret')- name: NEXTAUTH_URLvalue: $ResourceParam('web', 'url')- name: USER_POOL_CLIENT_IDvalue: $ResourceParam('userPool', 'clientId')- name: USER_POOL_CLIENT_SECRETvalue: $ResourceParam('userPool', 'clientSecret')- name: USER_POOL_PROVIDER_URLvalue: $ResourceParam('userPool', 'providerUrl')- name: USER_POOL_DOMAINvalue: $ResourceParam('userPool', 'domain')database:type: relational-databaseproperties:engine:type: postgresproperties:primaryInstance:instanceSize: db.t4g.microcredentials:masterUserPassword: $Secret('t3app-db-password')userPool:type: user-auth-poolproperties:generateClientSecret: truecallbackURLs:- $CfFormat('{}/api/auth/callback/cognito', $ResourceParam('web', 'url'))logoutURLs:- $CfFormat('{}/api/auth/signout', $ResourceParam('web', 'url'))
Contents of stacktape.yml
As we can see, we have added a lot of environment variables, so let me break it down for you:
DATABASE_URL- required for communicating with the database. We are using $ResourceParam directive to resolve the connection string URL during deployment.NEXTAUTH_SECRETandNEXTAUTH_URL- are required for the correct functioning of NextAuth.js. You can see that we have used a $Secret directive to reference a secret. We will create the secret later in the tutorial.USER_POOL_CLIENT_ID+USER_POOL_CLIENT_SECRET+USER_POOL_PROVIDER_URL+USER_POOL_DOMAIN- these environment variables are resolved during deployment from our userPool resource and are required for making CognitoProvider work.
In many cases, it would be easier to use connectTo property to automatically inject information about other resources into our Next.js web app. In this tutorial, we are adhering to how CT3A names the env variables and we are passing the environment variables explicitly.
Add scripts and hooks
We have all the resources configured but are still missing a few pieces. During CT3A initialization, we chose to use Prisma ORM to make it easy to work and interact with the Postgres database in our stack.
The pre-generated schema (data model definitions) resides in prisma/schema.prisma file. To ensure that both our
Prisma client (which we use in our Next.js web) and our Postgres database schema are in sync with our Prisma
schema, we need to:
- Before deployment: generate Prisma client using the command
prisma generate. The generated client will be used inside the Next.js web. - After deployment: migrate Postgres database schema using the command
prisma db push, so the Postgres database is in sync with our Prisma schema data model.
To automate these steps and make them part of our deployment process, we will use scripts and hooks
Copy
scripts:generateClient:type: local-scriptproperties:executeCommand: npx prisma generatemigrateSchema:type: local-scriptproperties:executeCommand: npx prisma db pushenvironment:- name: DATABASE_URLvalue: $ResourceParam('database', 'connectionString')hooks:beforeDeploy:- scriptName: generateClientafterDeploy:- scriptName: migrateSchemaresources:web:type: nextjs-webproperties:appDirectory: ./environment:- name: DATABASE_URLvalue: $ResourceParam('database', 'connectionString')- name: NEXTAUTH_SECRETvalue: $Secret('t3app-nextauth-secret')- name: NEXTAUTH_URLvalue: $ResourceParam('web', 'url')- name: USER_POOL_CLIENT_IDvalue: $ResourceParam('userPool', 'clientId')- name: USER_POOL_CLIENT_SECRETvalue: $ResourceParam('userPool', 'clientSecret')- name: USER_POOL_PROVIDER_URLvalue: $ResourceParam('userPool', 'providerUrl')- name: USER_POOL_DOMAINvalue: $ResourceParam('userPool', 'domain')database:type: relational-databaseproperties:engine:type: postgresproperties:primaryInstance:instanceSize: db.t4g.microcredentials:masterUserPassword: $Secret('t3app-db-password')userPool:type: user-auth-poolproperties:generateClientSecret: truecallbackURLs:- $CfFormat('{}/api/auth/callback/cognito', $ResourceParam('web', 'url'))logoutURLs:- $CfFormat('{}/api/auth/signout', $ResourceParam('web', 'url'))
Contents of stacktape.yml
In the scripts section, we have specified two scripts:
generateClient- generates clientmigrateSchema- migrates schema (env variable DATABASE_URL is automatically resolved during script execution).
In the hooks section, we reference the scripts to execute during specified deployment phases. This is the way of telling Stacktape when to execute the scripts. You can also execute scripts manually using script:run command.
Create Secrets
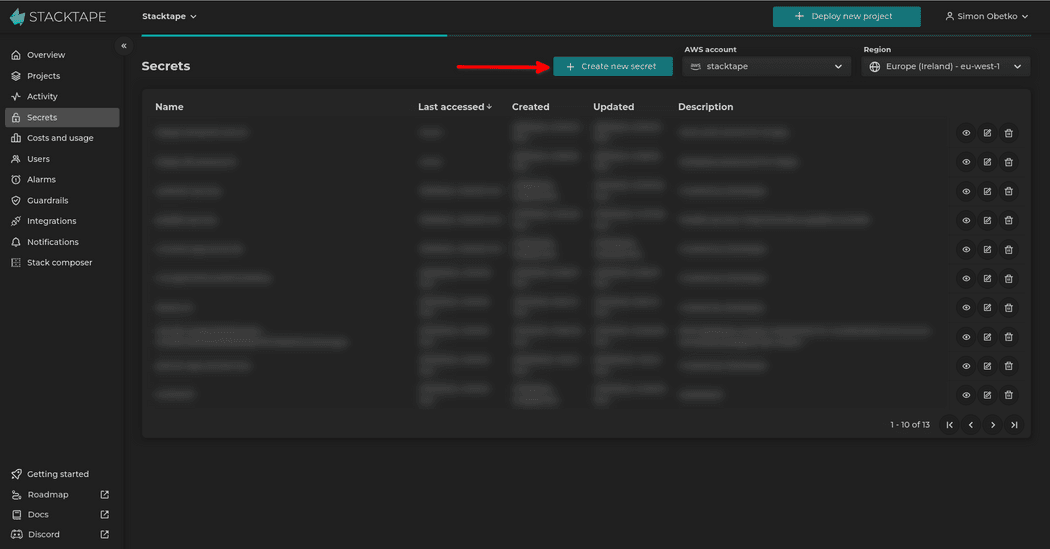
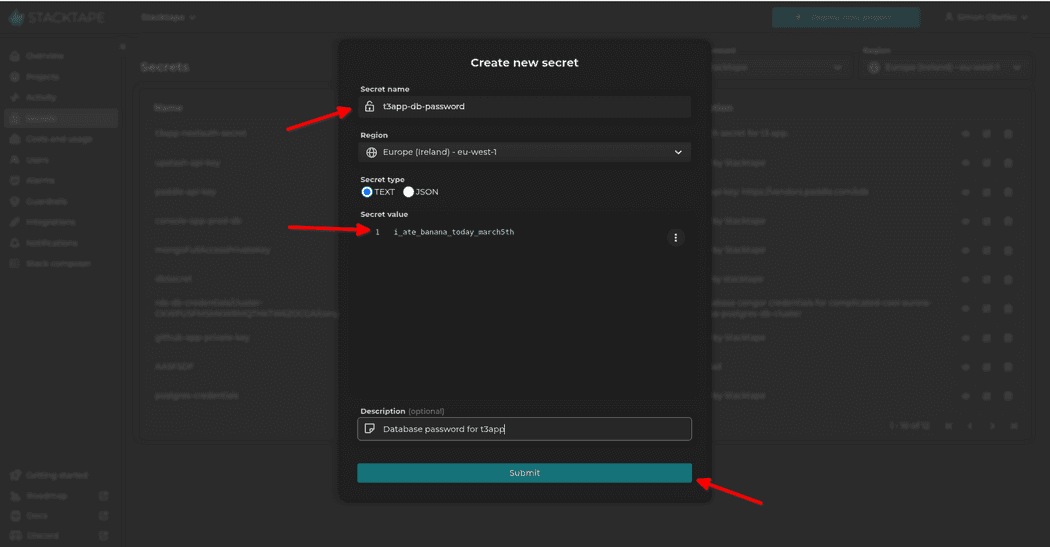
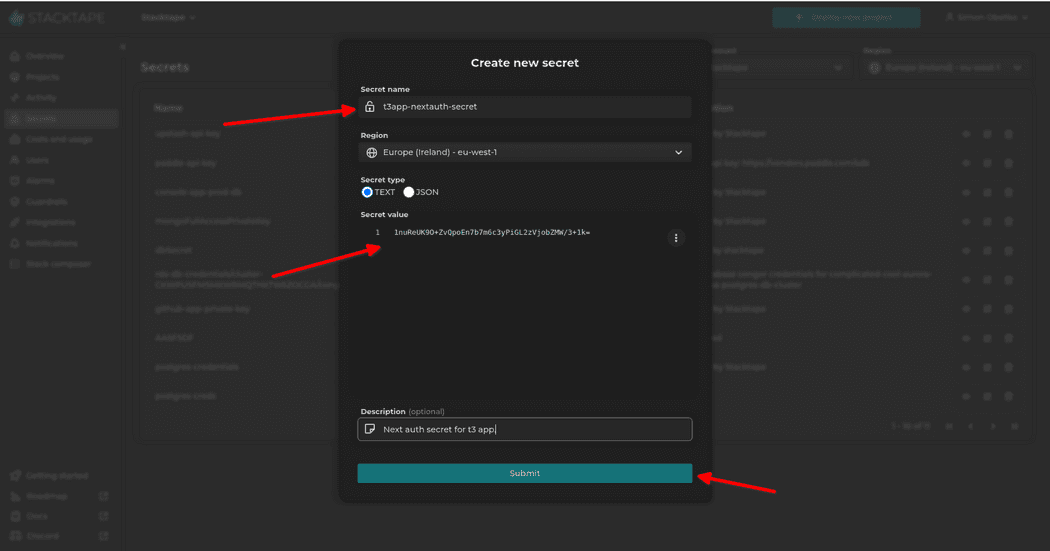
In our stacktape.yml we have referenced two secrets t3app-db-password and t3app-nextauth-secret.
You can create these secrets easily in stacktape console.
Remember to create secrets in a region where you plan to deploy.
From NextAuth.js docs: You can quickly create a good value for the NEXTAUTH_SECRET on the command line via this openssl command:
openssl rand -base64 32
Adjust CT3A Next.js app
So far, we have:
- initialized our T3 Next.js app
- created our
stacktape.yml, - and created secrets.
Last step is to make minor adjustments to the generated Next.js web app to make it work with AWS Lambda (upon which our nextjs-web resource is built) and AWS Cognito.
Modify src/env.js
Apps initialized by CT3A use the @t3-oss/env-nextjs package to bring order, validation, and transparency into
environment variables handling.
Based on the environment variables we are passing to our nextjs-web resource, we need to adjust the src/env.js:
- We are commenting out env variables needed for Discord auth (CT3A app initializes a project to use DiscordProvider with NextAuth.js, but we will be using CognitoProvider) and replacing them with variables needed for Cognito auth.
- We are disabling/skipping the validation of environment variables during the build because environment variables will be resolved during deployment but are not available during build time.
Copy
import { createEnv } from "@t3-oss/env-nextjs";import { z } from "zod";export const env = createEnv({/*** Specify your server-side environment variables schema here. This way you can ensure the app* isn't built with invalid env vars.*/server: {DATABASE_URL: z.string().url().refine((str) => !str.includes("YOUR_MYSQL_URL_HERE"), "You forgot to change the default URL"),NODE_ENV: z.enum(["development", "test", "production"]).default("development"),NEXTAUTH_SECRET: process.env.NODE_ENV === "production" ? z.string() : z.string().optional(),NEXTAUTH_URL: z.preprocess(// This makes Vercel deployments not fail if you don't set NEXTAUTH_URL// Since NextAuth.js automatically uses the VERCEL_URL if present.(str) => process.env.VERCEL_URL ?? str,// VERCEL_URL doesn't include `https` so it cant be validated as a URLprocess.env.VERCEL ? z.string() : z.string().url()),// adding user pool env variablesUSER_POOL_CLIENT_ID: z.string(),USER_POOL_CLIENT_SECRET: z.string(),USER_POOL_PROVIDER_URL: z.string(),USER_POOL_DOMAIN: z.string()// DISCORD_CLIENT_ID: z.string(),// DISCORD_CLIENT_SECRET: z.string(),},/*** Specify your client-side environment variables schema here. This way you can ensure the app* isn't built with invalid env vars. To expose them to the client, prefix them with* `NEXT_PUBLIC_`.*/client: {// NEXT_PUBLIC_CLIENTVAR: z.string(),},/*** You can't destruct `process.env` as a regular object in the Next.js edge runtimes (e.g.* middlewares) or client-side so we need to destruct manually.*/runtimeEnv: {DATABASE_URL: process.env.DATABASE_URL,NODE_ENV: process.env.NODE_ENV,NEXTAUTH_SECRET: process.env.NEXTAUTH_SECRET,NEXTAUTH_URL: process.env.NEXTAUTH_URL,// user pool env variablesUSER_POOL_CLIENT_ID: process.env.USER_POOL_CLIENT_ID,USER_POOL_CLIENT_SECRET: process.env.USER_POOL_CLIENT_SECRET,USER_POOL_PROVIDER_URL: process.env.USER_POOL_PROVIDER_URL,USER_POOL_DOMAIN: process.env.USER_POOL_DOMAIN// DISCORD_CLIENT_ID : process.env.DISCORD_CLIENT_ID,// DISCORD_CLIENT_SECRET: process.env.DISCORD_CLIENT_SECRET,},/*** Run `build` or `dev` with `SKIP_ENV_VALIDATION` to skip env validation. This is especially* useful for Docker builds.*/skipValidation: true // !!process.env.SKIP_ENV_VALIDATION,/*** Makes it so that empty strings are treated as undefined. `SOME_VAR: z.string()` and* `SOME_VAR=''` will throw an error.*/emptyStringAsUndefined: true});
Contents of src/env.js
Modify src/server/auth.ts
As we have touched on earlier, the CT3A app initializes a project to use DiscordProvider with NextAuth.js, but we are
using CognitoProvider. Therefore, we need to modify
src/server/auth.ts.
Copy
import { PrismaAdapter } from "@auth/prisma-adapter";import { getServerSession, type DefaultSession, type NextAuthOptions } from "next-auth";import { type Adapter } from "next-auth/adapters";import CognitoProvider from "next-auth/providers/cognito";// import DiscordProvider from "next-auth/providers/discord";import { env } from "~/env";import { db } from "~/server/db";/*** Module augmentation for `next-auth` types. Allows us to add custom properties to the `session`* object and keep type safety.** @see https://next-auth.js.org/getting-started/typescript#module-augmentation*/declare module "next-auth" {interface Session extends DefaultSession {user: {id: string;// ...other properties// role: UserRole;} & DefaultSession["user"];}// interface User {// // ...other properties// // role: UserRole;// }}/*** Options for NextAuth.js used to configure adapters, providers, callbacks, etc.** @see https://next-auth.js.org/configuration/options*/export const authOptions: NextAuthOptions = {callbacks: {session: ({ session, user }) => ({...session,user: {...session.user,id: user.id}})},adapter: PrismaAdapter(db) as Adapter,providers: [CognitoProvider({clientId: env.USER_POOL_CLIENT_ID,clientSecret: env.USER_POOL_CLIENT_SECRET,issuer: env.USER_POOL_PROVIDER_URL})// DiscordProvider({// clientId: env.DISCORD_CLIENT_ID,// clientSecret: env.DISCORD_CLIENT_SECRET,// }),/*** ...add more providers here.** Most other providers require a bit more work than the Discord provider. For example, the* GitHub provider requires you to add the `refresh_token_expires_in` field to the Account* model. Refer to the NextAuth.js docs for the provider you want to use. Example:** @see https://next-auth.js.org/providers/github*/]};/*** Wrapper for `getServerSession` so that you don't need to import the `authOptions` in every file.** @see https://next-auth.js.org/configuration/nextjs*/export const getServerAuthSession = () => getServerSession(authOptions);
Contents of src/server/auth.ts
Modify src/trpc/react.tsx
During CT3A initialization, we chose to use tRPC framework. This framework simplifies and accelerates the development of typesafe APIs in TypeScript applications by automatically inferring types from your API to the client.
However, CT3A initialized the tRPC client to use new HTTP streaming features, which are still unstable. Moreover, streaming is still considered experimental with both OpenNEXT adapter (internal part of nextjs-web resource) and AWS Lambda (on which the Next.js app will run).
Therefore, we switch from the HTTP streaming to the proven HTTP request/response.
Copy
"use client";import { QueryClient, QueryClientProvider } from "@tanstack/react-query";import { loggerLink, httpBatchLink } from "@trpc/client";import { createTRPCReact } from "@trpc/react-query";import { useState } from "react";import { type AppRouter } from "~/server/api/root";import { getUrl, transformer } from "./shared";const createQueryClient = () => new QueryClient();let clientQueryClientSingleton: QueryClient | undefined = undefined;const getQueryClient = () => {if (typeof window === "undefined") {// Server: always make a new query clientreturn createQueryClient();}// Browser: use singleton pattern to keep the same query clientreturn (clientQueryClientSingleton ??= createQueryClient());};export const api = createTRPCReact<AppRouter>();export function TRPCReactProvider(props: { children: React.ReactNode }) {const queryClient = getQueryClient();const [trpcClient] = useState(() =>api.createClient({transformer,links: [loggerLink({enabled: (op) =>process.env.NODE_ENV === "development" || (op.direction === "down" && op.result instanceof Error)}),httpBatchLink({url: getUrl()})]}));return (<QueryClientProvider client={queryClient}><api.Provider client={trpcClient} queryClient={queryClient}>{props.children}</api.Provider></QueryClientProvider>);}
Contents of src/trpc/react.tsx
Modify prisma/schema.prisma
By default, the prisma generate command generates a Prisma client that is runnable on your current OS platform
(platform of your workstation). However, once we deploy, the Prisma client will be running on AWS Lambda which might
(and probably does) use a different underlying OS platform.
To make Prisma generate a client for AWS Lambda, we need to specify binaryTargets for client in prisma/schema.prisma
file:
Copy
generator client {provider = "prisma-client-js"binaryTargets = ["native", "rhel-openssl-1.0.x"]}datasource db {provider = "postgresql"// NOTE: When using mysql or sqlserver, uncomment the @db.Text annotations in model Account below// Further reading:// https://next-auth.js.org/adapters/prisma#create-the-prisma-schema// https://www.prisma.io/docs/reference/api-reference/prisma-schema-reference#stringurl = env("DATABASE_URL")}model Post {id Int @id @default(autoincrement())name StringcreatedAt DateTime @default(now())updatedAt DateTime @updatedAtcreatedBy User @relation(fields: [createdById], references: [id])createdById String@@index([name])}// ... rest of the schema
Contents of prima/schema.prisma (incomplete)
Create src/middleware.ts
NextAuth.js is not perfect. One of the shortcomings is that it currently does not implement federated logout. This means that even if a user signs out of the Next.js app, he does NOT get signed out of the Cognito user pool client. As a consequence, the user is not really being logged out (i.e he is able to login again without providing the credentials). You can read more about this problem in this Github thread.
The simple solution for this problem is to create a redirect to facilitate the logout. We will implement the redirect
using Next.js middleware. Create a
src/middleware.ts file with the following content:
Copy
import { NextResponse } from "next/server";import type { NextRequest } from "next/server";import { env } from "~/env";// This function can be marked `async` if using `await` insideexport const middleware = (_request: NextRequest) => {return NextResponse.redirect([`https://${env.USER_POOL_DOMAIN}/logout?client_id=${env.USER_POOL_CLIENT_ID}`,`logout_uri=${encodeURIComponent(`${env.NEXTAUTH_URL}/api/auth/signout`)}`,`redirect_uri=${encodeURIComponent(`${env.NEXTAUTH_URL}/api/auth/signout`)}`,`response_type=code`].join("&"));};export const config = {matcher: "/api/signout"};
Modify app/page.tsx
Now that we have added the redirect, we need to make use of it inside our Next.js app. Modify the signout link inside
the app/page.tsx file:
Copy
import { unstable_noStore as noStore } from "next/cache";import Link from "next/link";import { CreatePost } from "~/app/_components/create-post";import { getServerAuthSession } from "~/server/auth";import { api } from "~/trpc/server";export default async function Home() {noStore();const hello = await api.post.hello.query({ text: "from tRPC" });const session = await getServerAuthSession();return (<main className="flex min-h-screen flex-col items-center justify-center bg-gradient-to-b from-[#2e026d] to-[#15162c] text-white"><div className="container flex flex-col items-center justify-center gap-12 px-4 py-16 "><h1 className="text-5xl font-extrabold tracking-tight sm:text-[5rem]">Create <span className="text-[hsl(280,100%,70%)]">T3</span> App</h1><div className="grid grid-cols-1 gap-4 sm:grid-cols-2 md:gap-8"><LinkclassName="flex max-w-xs flex-col gap-4 rounded-xl bg-white/10 p-4 hover:bg-white/20"href="https://create.t3.gg/en/usage/first-steps"target="_blank"><h3 className="text-2xl font-bold">First Steps →</h3><div className="text-lg">Just the basics - Everything you need to know to set up your database and authentication.</div></Link><LinkclassName="flex max-w-xs flex-col gap-4 rounded-xl bg-white/10 p-4 hover:bg-white/20"href="https://create.t3.gg/en/introduction"target="_blank"><h3 className="text-2xl font-bold">Documentation →</h3><div className="text-lg">Learn more about Create T3 App, the libraries it uses, and how to deploy it.</div></Link></div><div className="flex flex-col items-center gap-2"><p className="text-2xl text-white">{hello ? hello.greeting : "Loading tRPC query..."}</p><div className="flex flex-col items-center justify-center gap-4"><p className="text-center text-2xl text-white">{session && <span>Logged in as {session.user?.email}</span>}</p><Linkhref={session ? "/api/signout" : "/api/auth/signin"}className="rounded-full bg-white/10 px-10 py-3 font-semibold no-underline transition hover:bg-white/20">{session ? "Sign out" : "Sign in"}</Link></div></div><CrudShowcase /></div></main>);}async function CrudShowcase() {const session = await getServerAuthSession();if (!session?.user) return null;const latestPost = await api.post.getLatest.query();return (<div className="w-full max-w-xs">{latestPost ? (<p className="truncate">Your most recent post: {latestPost.name}</p>) : (<p>You have no posts yet.</p>)}<CreatePost /></div>);}
Contents of app/page.tsx
Deploy
Now, we are ready to deploy. You have two options for how to deploy:
- deploy using git (push-to-deploy)
- deploy using CLI
Deploy using Git (push-to-deploy)
If you prefer to deploy your app using push-to-deploy Github/Gitlab integration,
create a repository and then connect your repository to the
Stacktape in the console. After that, push
your app into the configured repository and branch.
Deploy using CLI
If you prefer to deploy from your workstation, you can use Stacktape CLI. To install it, follow the instructions in our docs.
After you have installed the CLI, use the codebuild:deploy or deploy command inside your project directory to deploy your app:
Copy
stacktape deploy --region eu-west-1 --stage my-stage --project-name my-t3-app
Explore the app
Explore your application in the Stacktape console. You can find your app URL and other information there.


